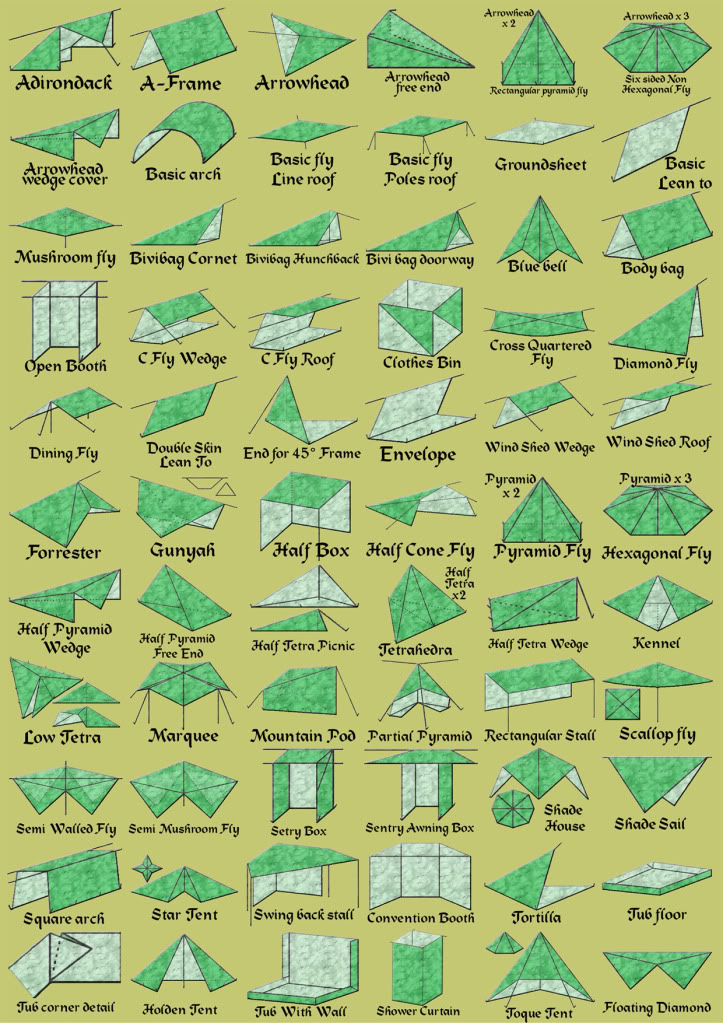
I came across this old-school infographic and thought it might be useful! There are some very elaborate uses for tarps here, but you never know when you might want or need to make one!
Last weekend was an action-packed adventure weekend for us here at Flow North. We thought we would share the highlights of our trip to the town of Peace River for three busy days.
Thursday night: York Boat Captain Book Launch
I held my first official book launch for York Boat Captain – 18 Life-Changing Days on the Peace River with the help of the wonderful people over at the Peace River Museum, Archives and Mackenzie Centre. It went very well, as I expected, and it was a pleasure to chat with everyone, answer questions about the book and the boat, and see some old friends. (Blog posts here and here.)
Friday, Aug 16: Peace River Extreme Adventures Camp
As a part of the Paddle the Peace event, I teach canoeing for youth — a program we call Paddle the Peace Junior. Last year, the tiny rural school of Keg River benefitted from the program, and this year, it was offered for the youth of Peace River through the town of Peace River’s Extreme Adventures summer camp. We had an instruction day in July, which went very well, and this was the second one. Thanks to everyone at the town who made this possible — the kids all had a great time and learned canoeing skills, safety and even a little teamwork.
Saturday, Aug 17: Canoe Instruction
Paddle the Peace is actually a 2-day event for us; the first day is canoe lessons for adults. In order to accommodate more people, we have one group in the morning (lunch is provided) and another group in the afternoon (supper provided). We had such great people, in canoes and kayaks, who toughed it out despite the wind and waves on the lake! We reviewed canoe strokes, steering, teamwork, stability, getting in and out, and plenty of safety items, including a quick on-the-grass demonstration of the T-Rescue — a great way to help canoeists who have flipped.
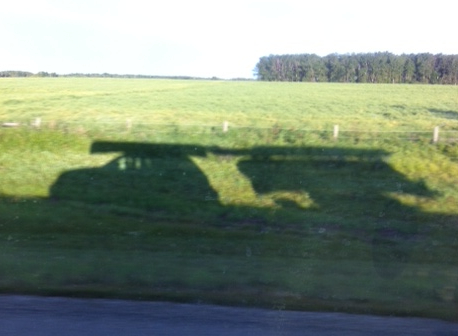
I love seeing the shadows of all the boats loaded on our vehicle and trailer.
Paddle the Peace: the Main Event! Sunday, Aug 18
As in years past, Flow North helps out by making canoes, kayaks and equipment available to people who need them! If a family didn’t have enough paddles, we lent them one. We lent PFDs to a mom for her kids. I always give the safety briefing on the bus before everyone goes out on the water, and with such a large group — about 100 paddlers! — I reminded everyone that it’s Sunday morning, so relax and be patient while others are boarding their boats. The whole process actually went very smoothly, as we staggered the departure of the two morning shuttles a little to eliminate a bottleneck of boats and people on the Shaftesbury shore.
A highlight of the day was the brunch at Strong Creek, provided by DMI, which allowed us to eat, chat and get to know one another. I think everyone agreed it was time well spent. On the whole, the day went remarkably well and nearly finished without any rain — just a downpour at the very end! My only regret: we were too busy to take pictures! Go to the Facebook page to see some posted there.
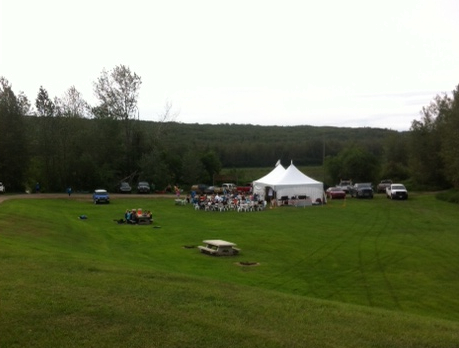
Looking down on the brunch tent and happy paddlers…
Let me not forget to thank everyone who worked so hard — over 20 volunteers — and funders who made the event possible. 🙂
– Shell Canada Peace River
– Daishowa-Marubeni International Ltd. (DMI)
– Travel Alberta
– Peace Regional Economic Development Alliance (PREDA)
Municipalities:
– County of Northern Lights
– Northern Sunrise County
– MD of Peace
– Town of Peace River
Well, mosquito season is upon us, and Darren came across this article which explains how to set up a very quick and easy mosquito deterrent for your backyard: an oscillating fan. Mosquitoes aren’t very good flyers, and we all know that a mild breeze is enough to keep them at bay. On a calm evening, why not make your own breeze with a fan! Of course, this won’t work when you’re on your canoeing trip, but it will work when you’re out in the backyard getting your equipment ready, like testing your survival gear (part 1, part 2, part 3)!
You can read the full article here.
We’ve been busy with some canoe instructing lately. If you’re in or near the town of Peace River, I believe there is one spot left for a youth for the town’s Extreme Adventures camp on August 16th. Call the Town to sign your child up. If you are an adult interesting in getting some lessons, you can partake in the half-day lessons on Saturday, August 17th, at Leddy Lake. This is a part of Paddle the Peace — check out this page for more info.
We are getting quite booked up for events such as canoe parties, so if you are thinking of having one, please contact us soon or we won’t be able to fit you in!
Hope you are all enjoying your summer so far!
Summer is such a busy time! I came across this page of Camping Hacks and thought I would share it. Some are completely impractical for canoe or kakak trips, but several are usable, such as the tin-can bread, the toilet paper holder, the pre-made coffee bags and the tic tac boxes for spices. And if someone can tell us what’s in Mountain Dew that makes it GLOW like that, that would be great! (Crazy!)
We are busy getting ready for some canoe lessons for a Girl Guide group next week! It is going to be a lot of fun!
Remember, we don’t offer scheduled guided trips, but if you have a few people who want to go with you, call us and we’ll get you all set up for your self-guided trip (day trip or overnight trip). There are SO many options and great places to go! A few times a year, we may be able to come along and guide your trip, so call us soon if that’s what you are interested in.
Just had to take a minute and share a unique getaway in a river! From cbc.ca, there is a tiny one-room cabin perched on a rock in the River Drina in Serbia.
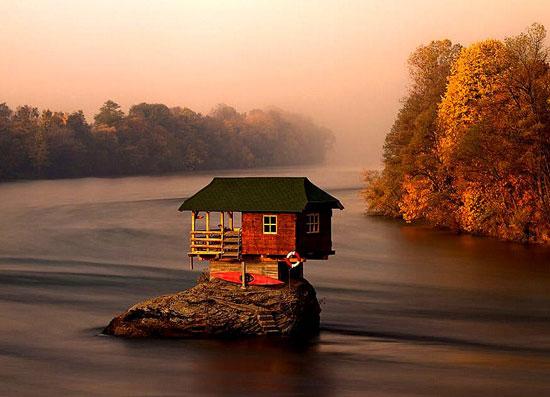
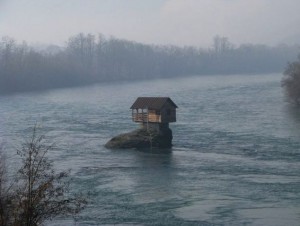
Of course, this has me thinking…. any rocks I know of, big enough for a hideout of my own? 🙂
Thank you, CBC! 🙂 Original article is here.
I thought it might be useful to take some time to explain how maps work.
The Earth is divided into sections, using lines that run North-South and lines that run East-West. The size of each section depends on the scale, such as 1:250,000 or 1:50,000. The larger the second number in that ratio, the more “zoomed out” the map is. If you think about it, 1:1 would be a life size drawing, so the bigger the ratio, the more of “real life” is represented on the piece of paper that makes up the map.
These more-or-less rectangular sections are grouped into 4 x 4 grids. Canada is divided up into large numbered sections, with numbers increasing from East to West and North to South. For example, Saskatchewan is essentially 72, 73 and 74, Alberta is 82, 83 and 84, and BC is 92, 93 and 94, with the larger number being farther north. Within each, the land is further subdivided into 16 sections (in a 4 x 4 grid) and given letters as names. Again, each lettered sections at the scale of 1:250,000 are divided into 16 maps (4 x 4 grid) that are numbered.

See how “D C B A” goes across the bottom? Letter A is in the lower right corner of section 83 in the map above — the letters zig zag their way through the grid, from A to P. The numbering within each section, 1 to 16, is in the same manner.
So, now you can see how to track down which map you need for a given area. Look at this one:

See the Peace River squiggling its way from the lower left corner to the upper right? On this map, it comes on the scene in D4 as little blue line. Suppose, however, that you want to start your trip at Notikewin Provincial Park — that’s the green blob in section F which the river flows past. You will need to get maps for 84-F (1:250,000) or for more detail, F3 and F6 (1:50,000). I can give you a tip: for the Peace River, you don’t really need the 1:50,000 scale, which is a good thing, because if you did, you’d need a LOT of maps. The 1:250,000 scale work well enough. For the Hay or Chinchaga rivers, you’ll want the 1:50,000 scale. For my own use, I open the maps in my computer and crop out the parts I don’t need and then get them printed on 11″ x 17″ paper. They work great this way!
Now, to find a specific spot on the Earth, you need coordinates. Latitude and longitude is the old way of doing it, and the numbers increase from East – West and South – North. To remember how it works for longitude (East-West coordinate), a good way to think of it is that’s the direction that the sun moves across the Earth — it rises in the Maritime provinces before it gets to the prairies. As for latitude, the higher North you go, the bigger the number. You can use degrees, seconds and minutes, or simply decimal degrees (such as 54.43532 N) for both coords.
There is another coordinate system, however. In that one, called UTM (for Universal Transverse Mercator), the East-West coordinate increase is reversed; this one gets bigger from West to East, like when you read a book from left to right. The other coordinate still gets bigger as you go North. Here, the coords actually translate into metres on the Earth, and they are called “Northing” and “Easting.”

Look at a 1:250,000 topo map like the Canadian Government makes available (a portion above). The UTM coords are indicated in light blue letters and grid lines and the Latitude/Longitude is in black along the sides of the map. Lat and Long have no grid lines spanning the map.
The multitude of orange lines everywhere are gravel roads and they delineate sections, such as farmers use. The grey fat lines (and corresponding grey letters using R and Tp) indicate townships and sometimes county boundaries, but that’s a whole other geography lesson!
So, if you had to figure out where you were, you could read your coords off a GPS and then find them on the map by seeing where the two numbers cross. You might be thinking “but my GPS display will show me where I am.” That is true, however, when you are in the wilderness, you may find your GPS unit to be surprisingly non-useful — it will show you nothing if there are no roads or labelled features in its database. Wilderness = big empty space. This, of course, is not true! Wilderness = trees, creeks, wetlands, more trees, shrubs, hills, valleys, ponds, and so on.
Of course, the beauty of topo maps is seeing the slopes (topography). This gives you heads-up as to where the highest banks along the river will be, and where creeks flow in. Just a couple other notes: green areas are undeveloped (crown land) and designated parks. White land is, essentially, land that is owned by someone (farm land around here). Blue is obviously water, and marshy areas or wetlands have little, well, marshy symbols! Black dotted lines are usually cutlines and/or seismic lines, but can also be pipelines or quad/skidoo trails.
There is an abundance of information portrayed on a map once you know how to read it! Aren’t maps great!?
For more about the National Topographic System of Canada, go here.
In the spirit of sharing, inspired by Derek Sivers, the amazing guy who started CD Baby and made it into a phenomenal success, I thought I’d share some paddling tips I’ve learned over the years. The ones below are for expeditions in particular.
Give yourself more time, not less. Whenever there’s question of how long it might take to paddle a certain stretch of a river, always plan for more time instead of less. Bring extra food. Then, if you’re using a SPOT device, your pick-up person will see you’re running a little behind and pick you up later.
You don’t need all the fancy gear. A quick-dry shirt and pants that dry fast are about all I would say you need as far as particular clothes. You don’t need expensive wool long johns — they are $100+ in some stores! — any old pair will do. Boring old rubber boots, whatever water socks or sandals you like. It’s one of the best hobbies for not needing a lot of specialized gear. I hate to say it, but MEC and similar places make you think you need to spend hundreds on clothes, but you don’t. At all. The only exception to this, I’m afraid to say, is a good quality bug jacket and hat!
Bring extra socks. When you’re cold and wet, nothing feels better than a clean, dry pair of socks. And they are so small, it’s easy to pack a few extra pairs. Along those lines, always have two pairs of footwear, such as sandals and rubber boots, or running shoes and boots. Try to keep one dry at all times, so you have can have happy, warm feet in camp.
Follow along on your maps. Always keep track of where you are. You never know when you will need to go for help. It can be tricky on bendy rivers, but you have to find a way to do it. GPS units are great too, but don’t assume yours has any good databases showing the rivers — check first. You can always use your GPS to confirm your location by looking at your current coordinates. If you don’t know how to read a map, learn (I’ll do a post on this another time)! It is also a very good idea to know the wilderness rating of the river you are going on.
Wear some type of footwear at all times. It can seem so fun and fancy-free to be barefoot in your canoe, but if something should happen and you get separated from your boat, you might need to walk out. Doing so barefoot would be a thousand times harder than even the skimpiest sandals (running shoes, even better).
Take along some fire starter. You can’t always assume there will be dry tinder readily available. Have some paper, fire starter-sticks, or whatever you find to work best and, of course, matches. If you need a fire in a hurry, this will speed things up a lot. Double bag it in ziplock bags.
Don’t forget about fresh food. For shorter trips, you’d be surprised what food will keep. Fresh cucumbers or tomatoes are so tasty! Mind you, food always tastes better when you’re on a trip. I don’t know if it’s the outdoor air, the exercise, or the river flowing by, but supper in camp is always the best. Don’t you agree? 🙂
I finished Dangerous River by R.M. Patterson less than half an hour ago. As I read the last twenty pages or so, I savoured every word, wishing it could be a little longer, but feeling the end approaching with every paragraph. Spring was descending on the Nahanni River, which would bring the story full circle. It will be difficult to summarize Patterson’s incredible 270-page adventure, but I will try.
R. M. Patterson weaves a beautiful tapestry as he tells the story of his two excursions into the Nahanni country of the Northwest Territories. He went the first time in the summer of 1927, as a man with minimal wilderness experience but more than enough heart. He knew little of the country, but as he travelled North, through Fort Smith and Fort Resolution, he heard more and more legends about the First Nations people of the area — he called them “Indians” — and tales of lost prospectors, unsolvable mysteries, hidden gold mines, betrayal and murder. In the book, he recounts these legends at length, which gives a great background for the adventures to come.
And what adventures he has! His journey starts in northern Alberta, but he picks it up as he poles upstream on the Liard River, headed for the mouth of the South Nahanni river and the Nahanni Butte. He meets up with Albert Faille (pronounced “fay-lee,” a legend unto himself), and ends up travelling with him. The two of them make it up the South Nahanni river to the Flat River confluence, where Faille and he part ways. Patterson continues, working ingenious and risky methods upstream against the current, until he gets all the way to the base of Virginia Falls where he plays in the ripples and eddies, in the mist. It is incredible how well he travels completely on his own, and he isn’t exactly spartan about it:
“I defy anybody to better that breakfast menu, or to bring to it a better appetite: porridge, sheep liver and bacon, bannock, butter, marmalade and tea, topped off with a bowl of raspberries and cream. And the porridge, let me explain, was no invalid dish, nor would it ever figure on the diet sheet of a slimming movie star: porridge as developed by me on the Nahanni consisted of a mixture of rolled oats and whole wheat, and into this was thrown a little salt, a large pat of butter and a handful of seedless raisins. The finished product was served in a large bowl: on top of the porridge a thin slice of cheese was spread, and the dish was topped with a pouring of dried milk to the consistency of cream and a liberal sprinkling of brown sugar. It will be easily understood that this porridge lays a good foundation for a good breakfast to follow.” (page 69)
As you can see, Patterson’s writing style is descriptive and poetic, and I enjoyed the early 1900’s tone of the book. He manages to capture the magnificence of the scenery and breath-taking moments. In reading Dangerous River, I was reminded what it means to be alive, to explore, and to thrive in those incredible moments you experience when you are alone in the wilderness with the sun beating down on you, with only the birds for company… when you round the curve in a river to see cliffs you’ve never seen before… when you see an amazing sunrise or sunset, and you’re the only human around to witness it…
“I was heading east into the sun which was climbing into the sky above the Lower Canyon: as it rose it touched with fire and lit, one by one, the cottonwoods along the river and the clumps and belts of golden aspen poplar on the benches and the mountain slopes, till the valley shone with the flaring magnificence of the trees. The air was clear and keen like a fine dry wine, and the deep blue shadows of early morning filled the clefts and canyons of the hills…” (page 149)
In May of the following year, 1928, he returns to the Nahanni country with his friend, Gordon Matthews and a team of dogs. Through record-breaking flood levels, they work a three-canoe rig with small kicker upstream, although on the very first day going up the Nahanni, the kicker falls to disaster (a submerged deadhead). They continue on manually, ferrying above churning rapids, tracking in waist-high water, and surviving more than a few close calls. The author, however, knows when to call it quits and wait for the river to fall a little, or when to change techniques or simply accept that the risk is too high and a portage is necessary. He and Gordon make it up to Deadmen Valley where they establish a camp, complete with cabin, cache, traplines and hunting grounds.
The story continues as autumn descends and they work through the transition to frozen winter. They travel extensively around the valley — by canoe until there is too much ice running, on foot and later using dog sleds. There are many stories within this book, but I will just mention one: in late December, Gordon makes a trip to Fort Simpson with the dogs. He has to turn back once due to open water, so back at the cabin, they rig up a nested sled to hold a canoe, which then holds the smaller dog sled, and he switches to the canoe where the open water is. Suddenly, a wind comes up, the dogs get scared and all go to one side so the canoe capsizes! Luckily, they are near shore and he manages to save most of his gear; all the dogs swim to shore and he lights a huge bonfire from driftwood nearby to fend off hypothermia. He eventually arrives in Fort Simpson but is held up there due to major blizzards. When he doesn’t return on time, Patterson goes looking for him on foot, and through countless trials — which I won’t go into… I don’t want to give away all the suspense of the book! — he walks all the way to Fort Simpson where they are happily reunited. They return to their cabin later and continue to thrive through the winter and spring in the beautiful Deadmen Valley.
I’m afraid this review simply cannot do justice to the journey that Patterson was on! Although it was full of struggles and trials, much of it was borne happily, it seemed, and only in the truly miserable circumstances did he complain. As in all our lives, times of ease and joy balanced out the challenges and hardships; he truly seemed to know how to thrive in any circumstance. Patterson’s experiences in Dangerous River cover it all — hunting, trapping, wilderness living, dogsledding, canoeing and survival. I highly recommend this book!

I find it hard to blog about summer things when I’m caught in winter’s icy grip, however, I thought I might do a couple of book reviews. I recently read Todd Balf’s book The Last River — the Tragic Race for Shangri-La.
The book tells the tale of four men (plus their support team) bent on paddling, or at least seeing and portaging, the most remote parts of the Yarlung Tsangpo river in the remotest parts of Tibetan China. It is among the Himalayas, in that part of the world where the borders of India, Bhutan, Nepal and Tibet all meet. Like Everest, which is in the neighbourhood, the physical challenges the Tsangpo presents are beyond what one will find in other parts of the world: the steepest gorges in the world, the wildest rapids. The Tsangpo is a big volume river in one of the most difficult-to-access places on the planet.
Balf starts out giving a great historical overview of British explorers who began their attempts to chart the river in the 1860’s – 1920’s, when India was a long, unwieldy arm of the British empire where men campaigned for money to go on African safaris and it was normal to bring exotic species back to your sponsors or country as samples. One explorer, Francis Kingdon-Ward was even moderately successful in the Tsangpo gorge, but a gap of at least five miles of river remained completely unknown to the western world, and it was that section in particular that this modern group of intrepid explorers wanted to see, and if possible, paddle. There were early rumours of a 150-foot waterfall in the area — not hard to imagine on a river that drops 10,000 feet in a hundred-plus miles, although the rumour turned out to be caused by an error in translation. The area is mountainous, to say the least, and those early explorers believed that Shangri-La — a paradise of indescribable beauty — was hidden among its valleys and lush vegetation.
Jump forward to 1998. Months of planning and fundraising go by and the team’s logistical expert even gets his hands on satellite pictures of the area. A massive hydraulic (waterfall) is visible, perhaps a 100-foot fall after all, and at least two other significant drops are crammed into a paperclip-shaped bend. The guys will definitely be portaging at times, but the team hopes to paddle as much water as they can. Portaging in this gorge isn’t just picking up your canoe and walking; it is intense hiking and even full-blown rope-assisted rock climbing. When the team finally gets to the river, they see a writhing beast, well overflowing its banks in high flood stage. Their first dip in nearly ends in tragedy, as one paddler gets dislodged from his kayak and almost can’t perform the essential and, for these guys, easy, roll manoeuvre. Ultimately, the group’s intense risk-taking on the turbulent river take one man’s life, and the remainder of the book is about decisions, big-signature-funded expeditions and a discussion of the legacy of that man. (I’ll keep the man’s identity a secret, in accordance with the back cover write-up of the book.)
On the whole, the book is a comprehensive look at the expedition, covering every angle and many details, including a significant look at the sport and culture of whitewater kayaking. Why do people take risks? Is it acceptable to take such risks when you have a wife to widow and children to orphan? On the other hand, should one have to give up one’s passions for safety and security? Must you climb “the Everest” before you? What affects a paddler’s decisions, as he or she scouts and paddles the water, or chooses to portage? Is there undue pressure put on paddlers by their funders to “make it happen?” Todd Balf’s treatment and discussion of these issues is sensitive and multi-faceted — making for an enjoyable and thought-provoking read.
You can find The Last River on Amazon here: Amazon.ca | Amazon.com

Happy New Year! As we look back on 2012, we wanted to share some things that we’re very pleased about and some things we are looking forward to in 2013.
York Boat Expedition

Hooray for another successful York Boat expedition! Along with Jae Penner of Peace Valley Woodcraft and everyone at GeoTourism Canada, we are so pleased with how the trip went this year. Stay tuned for plans for 2013! We are working with all the partners and past crew members to formulate the best plan for offering both long and short trips on the boat. It is such an amazing experience, we are looking forward to sharing it with more people. If you are interested in being a partner, please contact us without delay!
Canoe Camps
We once again offered several successful canoe camps, including a very special one for the students of the tiny country school, Dr. Mary Jackson School. The students and principal were such a joy to work with! Thanks so much for making that canoe camp so rewarding! This canoe camp was actually “Paddle the Peace Junior” (read more about Paddle the Peace below).
Memorable Trips

The three-day trip with the Junior Forest Rangers of Sustainable Resources Development was once again, a very memorable trip. We thoroughly appreciated each young man’s positive attitude and the excellent leadership displayed by the two staff, Mike and Rob. You guys are such great examples (and also very cool)! 🙂
Paddle the Peace
We once again partnered with the County of Northern Lights, Northern Sunrise County, the Town of Peace River, GeoTourism Canada, Mighty Peace Tourist Association, the Government of Alberta and the Alberta Sport, Recreation, Parks and Wildlife Foundation to offer Paddle the Peace in Peace River, AB. Weather for the day was perfect and we all agreed that the August date worked better than the June date we had tried in 2011 (it was cancelled that year due to high water levels). Flow North offered canoe lessons for adults — which were completely sold-out — as well as helping with the safety briefing and other logistics on the day of the event. We’d really like to thank Teresa Tupper from the County of Northern Lights for all her hard work!
Presentations
Teresa was pleased to do a 1+ hour presentation at the Peace River Museum and Archives this year. She spoke about her solo paddling, sublime experiences on the river, and how surviving a thunderstorm outdoors with no shelter changed her life. Everyone in attendance thoroughly enjoyed her slides and storytelling.
Teresa and Cheryll also gave a presentation to two lively grade two classes from Florence Macdougall School in High Level. The kids loved seeing pictures of the York boat and touching the HBC coat, but I think what they remember most is the taste of bannock and dried moose meat they got to try!
In 2013…
As mentioned, we are working on the exact details of our York boat offerings for 2013. We know you need to plan in advance, so we’ll be releasing the plan soon!
We will once again be offering trip guiding to interested groups — please contact us well in advance so we can discuss where you would like to go and what we can do to make your trip extra-special.
We are still happy to offer our drop-off and pick-up service for those paddling long distances. 🙂 Making use of your vehicle is the most economical way, but even if we use ours, it’s not as expensive as you might think. Contact us for more info!
Best wishes for 2013 and beyond!